Showing posts with label Creativity and DIY. Show all posts

Wednesday, 11 April 2012

Finished Taillight

Remember this one?

Original 1964-67 VW Bug Hella turn signal

It's finally done and mounted and it looks one hell of a lot better than stock! I made the bracket/socket holder from some scrap aluminiium I had lying around and I made a template to get the mounting holes in the mudguard just right.
I still have to cut the mudguard and ditch the crusty seat. And yes, that is a flywheel lying on the ground but that's back in after a coil change.
I also lowered the front light and gauge cluster. A small mod with a huge effect. I like that it has a stock vibe but just looks better.

New lights all around

Everything has been wired in after this photo was taken.

Lower head light looks a lot faster.


Anaglyph View

- Bring your own 3D glasses.
An anaglyph is a picture that shows a 3 dimensional image when seen through a special pair of glasses with different lens colours. Usually the right lens is blue and the left is red.

As you will know from my last post I just returned from Japan. There will be a few more posts in the future about various subjects regarding that trip.

Amongst a lot of interesting sites we also visited Shirakawa-go a UNESCO world heritage village in the Shogawa river valley. While there I decided to take some photos to experiment a little with making anaglyph 3D images. I had now idea about how to make this kind of 3D image (I didn't even know their proper name at the time). All I knew was that I needed two photos of the same view taken from slighty different points corresponding to the distance between your eyes.
Today I followed a random tutorial on the web to try to make some anaglyphs and they actually turned out pretty cool.
Below are the original photos.


Now put on your special glasses and click to enlarge!

Shirakawa-go view in 3D

Shirakawa-go view in 3D

Shirakawa-go view in 3D
I have always wanted to learn to make this kind of 3D picure and it's actually quite easy so I see a lot of fun potential now. Both for school and for random stuff for the blog. Next I'll have to learn to make it by hand with watercolours. Yeah!

Thursday, 8 March 2012

Taillight In Spe

Curth over at Copenhagen Aircoolers gave me this cute little bug turnsignal. I think it will make for a neat taillight.
Original 1964-67 VW Bug Hella turn signal

Monday, 5 March 2012

Header Clamps Finally Done

I am happy to announce that my first pieces of fabrication are finished!
See this post for the background.
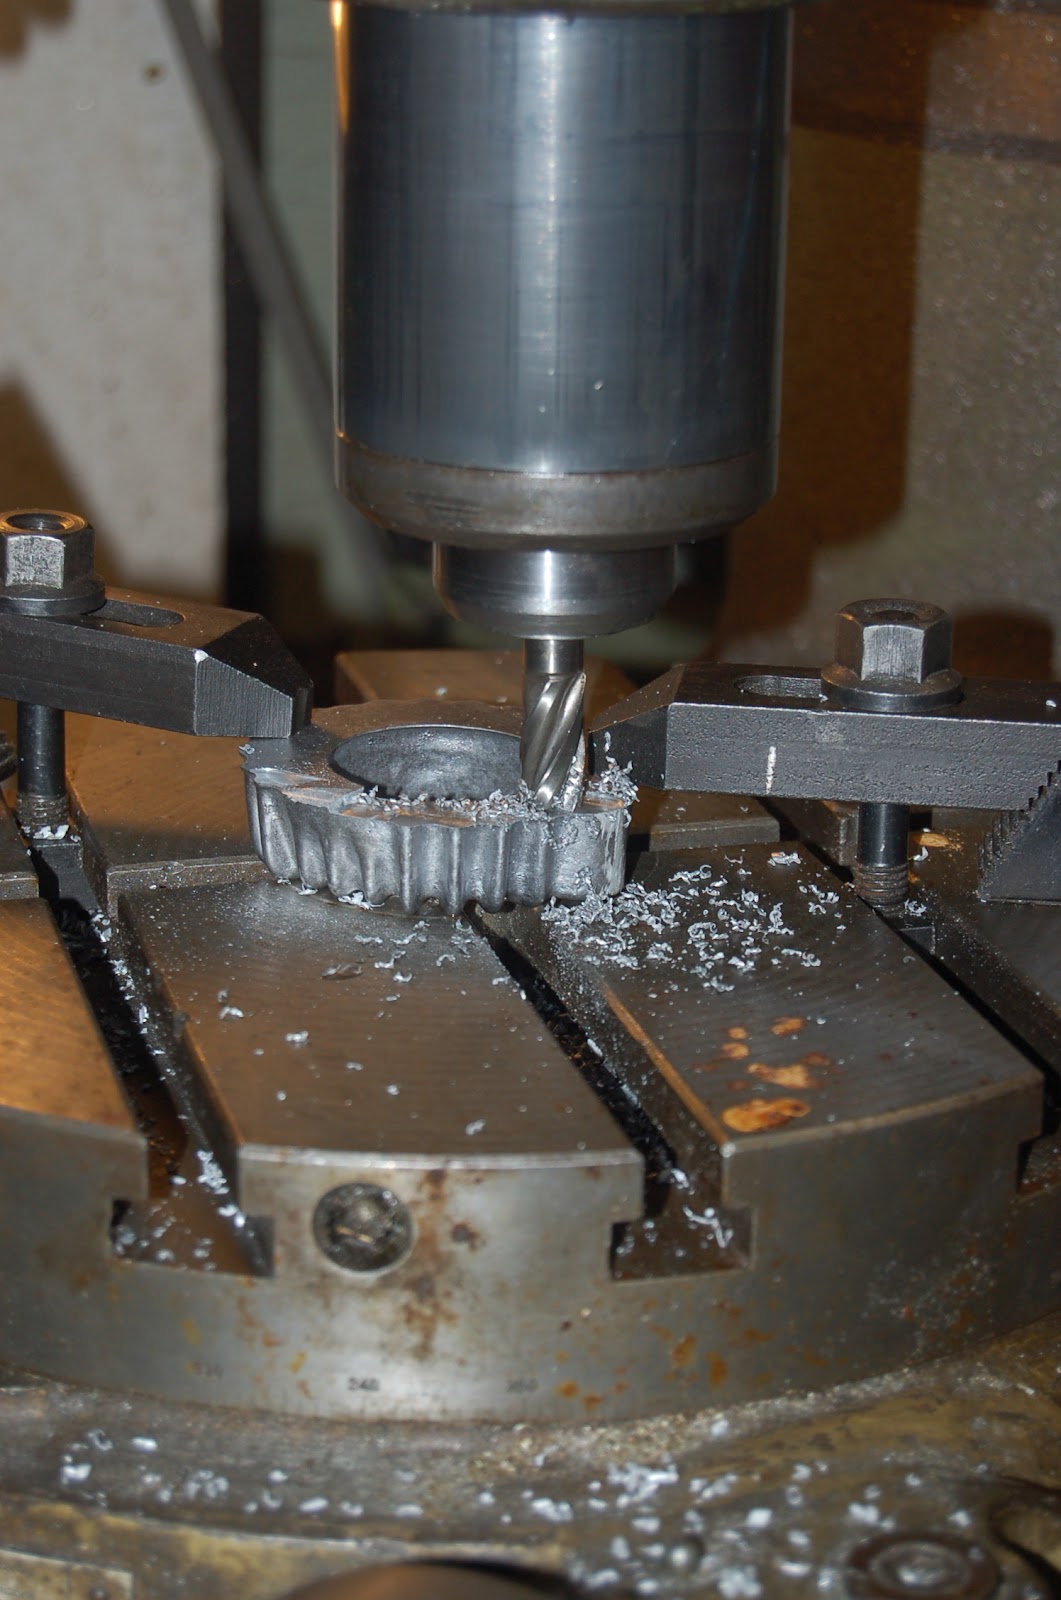
I have never used a milling machine before, but I found it very amusing trying to follow a diagonal with the two axes of back-and-forth and left-and-right. The end result is pretty nice I think, some flaws from the casting sand and the backsides a bit funny looking, but I am still stoked with my own capability. And they weigh exactly the half of the stock ones. Not that I am a weight weenie, obviously.
Besides that it was a great excuse to go to oliehulen, which is a shared workshop space where Mads from my schools workshop spends every thursday night working on his very spectacular 1920ies Indian factory racer. Thank you for helping me out Mads. I owe you.
I also blasted, painted and baked the headers. The matte paint is hiding the rust craters pretty well - at least from a distance.

Wrrwrrwrrwrrr

The one in the back, out of focus is the one with the worst finish.


Bling
So pleased with this

Black is slimmimg.

Thursday, 19 January 2012

Header Clamps

We have a rather nice model workshop at my school,
The newest feature is a small foundry that I wanted to learn to use.
I used one of the old rotten header clamps as pattern, but it had a lot of small rust craters that would drag out the sand when I tried to make the mould.
That was dealt with by covering the thing with a sheet of 0.5mm acrylic on the vacuum table. See the lousy cell phone video below.
Next up was packing the sand tightly around the pattern, flip the frame and gently remove the plastic with the old clamp in it. I now had one half of the mould, the other half was just flat packed sand. Clamp the two together and pour in some aluminium (720°C).
I think they look pretty good just out of the mold. The next thing to do is taking down the burrs and gates in tha lathe  which I have no idea about how to use yet.


The pattern is ready. The wrinkles in the plastic make good air escape channels.


Packing sand.


The cope.

The drag and cope.

The gate is covered with a handfull of sand to let the metal set.


Et voilá!


They're already looking way better than the original.

Wednesday, 11 January 2012

Virtual Seat Pan

Over the past two weeks I have had a course in AutoCad and Rhinoceros. And though I'm not really good at it I thought I might as well try to make something useful so here's The drawings for my new seat project.
As to actually making it I think my best bet is to hammer it out of a sheet of aluminium over a wooden shape and then rivet on the brackets.
Sub frame and seat pan modelled in Rhino

Sub frame and seat pan modelled in Rhino

Projections from Rhino


Template made with AutoCad

Tuesday, 3 January 2012

Strap

While waiting for a strap I ordered for the Tissot I decided to try to make a leather strap for my Seiko 5. This is inspired by some flieger style watches I have seen on the web. The new full grain leather looks a bit dull, but I am looking forward to see it develop a nice patina.

Hand made leather strap

Hand made leather strap

Hand made leather strap

Hand made leather strap

Tuesday, 27 September 2011

Sambuichi

I had the great opportunity to participate in a one and a half day seminar lead by the great japanese architect Hiroshi Sambuichi.

Yesterday he held a lecture to tell us a little about his work and filosophy. I find his whole thought about making architecture part of the cycles of nature extremely inspirational.
Sambuichi tried to learn us that the earth consists of inert and moving material in a mutual influental relationship and that we should consider all the possible ways we influent the movements of air, water, etc. But it's not as much taking natural phenomenons into account as it's about controlling them and using them to your advantages.

For this short seminar my co-student and I seeked to use and intensify the howling winds at the western coast of jutland. Basicaly our structure consists of a big funnel that leads the winds into a giant organ pipe. We found that leaving the mouth of the pipe the only opening facing south creates a concentration of light at the flue. This emphazises the small space where the sound is actualy generated and makes this a very special area to experience. I can't imagine it's a very pleasant place to stay, but it was really fun and educational to make.

And please excuse the grimey cell phono photos.

Our model
Sambuichi seminar
Sambuichi seminar
Sambuichi seminar
Sambuichi seminar
Sambuichi seminar
Sambuichi seminar
Sambuichi seminar

Wednesday, 21 September 2011

Magpie

Today I finished a watercolour painting of a Magpie. It is based on a photo I found with imagesearch. My wife is contemplating having this as a tattoo on the back of her shoulder and I really think it could turn out beautiful.

Watercolour magpie

Watercolour magpie


Sunday, 21 August 2011

Artist's Conception

First of all, let's be clear that I am not an artist. But what do you do when you have a lot of ideas, but lack both workshop, tools and skills to carry them out? Not to mention money. I'm always planning a lot of modifications I'd like to do to the GT500. So I tried to mock up some of them in a drawing.
I love working with watercolours and I know a little on the technique, but there's still a lot to develop. I think the next thing for me to work with is layering. That should make the chrome and other shiny stuff come out better.
For this rendition I traced the base drawing to a piece of paper directly on the laptop screen using a softish pencil and a light hand. I taped that drawing to the light table and added my planned modifications on another piece on top of that. Lastly i fixed the watercolour paper over both the other layers and started colouring it in. I do one colour at a time and one area at a time and make sure not to start a new one before the one directly next to it is completely dry.

Sketching

Adding colour

Artist's conception of a custom Suzuki GT500

Saturday, 9 July 2011

Handmade Mother of Pearl and Silver Cufflinks: A Prototype

A while ago I got an idea stuck in my head and have since been spending quite some time hunting for the right buttons for this project. By coincidence I just found some nice ones in the perfect size - merely around the corner.
I got some off cuts of silver chain from a local jeweller and managed to actually make my first set of cufflinks. Now to test the durability of my craftmanship.
I bought plenty buttons so hopefully I will offer a few sets of cufflinks up for sale here in the near future. Let me know if you're interested.

Handmade sterling silver and mother of pearl cufflinks

Handmade sterling silver and mother of pearl cufflinks

Handmade sterling silver and mother of pearl cufflinks
Related Posts Plugin for WordPress, Blogger...